
Learn rainy day watercolor painting step by step with wet-on-wet technique: create soft skies, reflections, and atmospheric depth.
By Joy Mukherjee — self-taught watercolor artist, Kolkata. Exhibited at Indian Art Carnival, Shantiniketan 2025.
Quick Answer — How to Paint a Rainy Day Watercolor
- Wet-on-wet is the technique — wet your paper first, then drop pigment in. The paint spreads and softens on its own, creating the hazy, atmospheric quality monsoon skies actually have
- Water controls everything, not colour — the amount of water on your paper and brush determines whether edges are soft or hard, whether paint spreads or holds. Hue matters far less than most beginners think
- Value is the priority — how light or dark a passage is matters more than which colour it is. A grey monsoon sky reads correctly not because of the grey you mixed, but because it sits at the right value relative to the land beneath it
- The balance to find: paper shiny-wet but not pooling. Too much water and you lose all control; too little and the paint drags and refuses to spread
- Monsoon subjects ideal for wet-on-wet: overcast skies, misty treelines, rain on water, soft distance, flooded paths reflecting sky
- The beginner mistake that ruins most attempts: adding more paint to fix a wet wash. Wait for it to dry completely. Every touch on a drying wash makes it worse
Summary
Painting rain in watercolor is not about drawing raindrops. It is about atmosphere — soft edges, diffused light, muted contrast, the quality of air that has been rained on. Wet-on-wet is the technique that creates this, and monsoon is the subject that rewards it most naturally. Because the subject itself is atmospheric and soft, the accidents the technique produces — unexpected blooms, colors that drift — often become the painting.
This guide covers the technique from first principles, including the specific adjustments that painting in Indian monsoon humidity requires.
Table of Contents
- What Wet-on-Wet Actually Means
- The One Thing That Changes Everything: Water, Not Colour
- Why Monsoon Is the Right Subject to Learn This Technique
- Step-by-Step: Painting a Rainy Day Sky
- Painting in Actual Monsoon Conditions — What Changes
- Value, Not Colour — The Most Important Lesson
- Common Mistakes and What They Actually Mean
- A Note on Materials
- Frequently Asked Questions
What Wet-on-Wet Actually Means
The phrase sounds technical. It is not.
Wet-on-wet means: you wet the paper first, then add paint into that wet surface. The wet paper and wet paint meet, and the paint spreads into the moisture — softening at the edges, diffusing outward, going where the water already is.
The alternative is wet-on-dry: wet paint on completely dry paper. This gives you sharp, controlled edges. The paint stays exactly where you put it. For a deeper comparison of when to use each, see the full wet-on-wet vs wet-on-dry breakdown.
What makes watercolor unique as a medium is that both techniques coexist in the same painting, often within centimetres of each other. The soft sky is wet-on-wet. The hard line of a rooftop against that sky is wet-on-dry. You switch between them by simply waiting for the paper to dry — or deliberately keeping it wet.
Monsoon paintings live mostly in wet-on-wet territory. The monsoon sky has no hard edges. The air is full of moisture. The treeline across a flooded paddy field dissolves into grey-green blur. The technique mirrors the subject because the technique is literally about water behaving like water. There is a 500-year tradition behind this — from Ragamala miniatures to contemporary Indian watercolor, the monsoon has always been painted with methods that reflect its physical atmosphere. The cultural history of monsoon in Indian art covers that lineage in full.
Watch the Wet-on-Wet Demonstration
I recorded this tutorial specifically to show what water control looks like in practice — some things are easier to understand by watching than by reading.
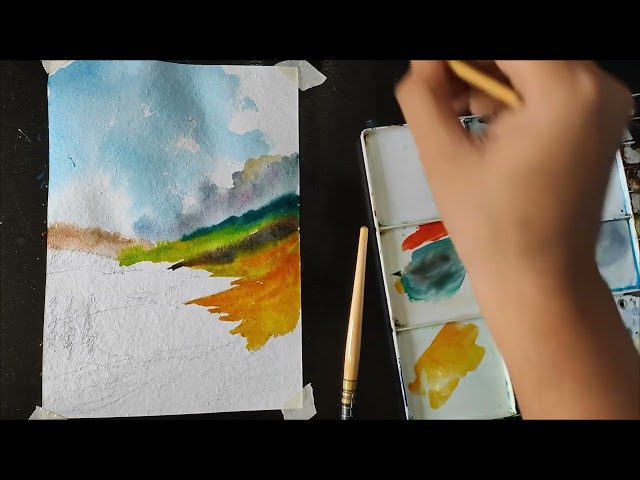
What the video demonstrates — before anything else — is that value matters more than colour. You can paint a monsoon sky with almost any grey-blue on your palette. What makes it read correctly is whether it sits at the right value relative to the land beneath it. In watercolor, value is controlled almost entirely by how much water you use, not which colour you reach for.
Everything else in this post builds on that.
The One Thing That Changes Everything: Water, Not Colour
When a wet-on-wet passage goes wrong — when paint blooms where you didn't want it, or drags instead of spreading, or dries with a hard edge through the middle of what should be a soft sky — the instinct is to blame the colour. Wrong mix. Wrong brand. Wrong pigment.
Almost always, it is the water.
Specifically, the relationship between how wet the paper is and how wet the paint on your brush is. This relationship has three states:
Too much water on paper, too much on brush: The paint spreads everywhere. Colour diffuses so much it becomes pale and flat. This is why beginners' skies go grey and watery even with a strong blue mixed.
Too little water on paper, or paper already drying: The brush drags. Paint sits where you put it instead of spreading. If you add more paint into a wash that is half-dry, you get a bloom — a hard-edged explosion of new pigment pushing the old pigment outward. This is the most common and most heartbreaking mistake in watercolor.
The right balance — paper shiny-wet, brush loaded but not dripping: Paint spreads smoothly. Edges soften where you want them soft. A second colour dropped in blends without fighting. This is the state you are always aiming for.
The skill in wet-on-wet is learning to read the surface. You learn to see — from the way light catches the sheen of wet paper — which state you are in. This is developed through practice. There is no other way.
Why Monsoon Is the Right Subject to Learn This Technique
Most subjects punish wet-on-wet mistakes immediately. A flower painted wet-on-wet that goes wrong looks like a muddy stain. A portrait that bleeds has obvious problems.
Monsoon landscapes are forgiving in a way most subjects are not. Because the subject is atmospheric and soft, the accidents wet-on-wet produces — unexpected blooms, colors that drift — often become the painting. A bloom in a sky passage reads as a cloud. A colour that drifted from the treeline into the sky reads as mist.
This logic runs through the entire nature series. The mist at the base of The Hidden Fall was created by dropping wet pigment into a pre-wetted surface. The atmospheric quality in the sky of Where the Light Waits did not arrive from planning — it arrived from setting up the right conditions and letting the pigment behave on wet paper.
I painted Monsoon Village on a July day in Kolkata — not from a photograph, but from the view through the window. The kind of morning where the boundary between sky and everything beneath it becomes meaningless, where the trees across the road dissolve into grey-green suggestion rather than individual leaves. The painting works because the technique matches the subject. Wet-on-wet is the only approach that produces that dissolution honestly.
 Tea Stall — the amber glow held against a heavy monsoon sky. A study in light temperature and wet-on-wet atmosphere. The rain-soaked road becomes a mirror for the stall's warmth.
Step-by-Step: Painting a Rainy Day Sky in Watercolor
You need very little for this exercise: a small sheet of watercolor paper (at least 200gsm, cotton if possible), a large and a medium round brush, and three colours — a grey-blue, raw umber or burnt sienna, and any green. That is enough for a first rainy day watercolor.
Step 1 — Wet the paper
Use a wide, clean brush and cover the sky area with plain water. The paper should be visibly wet — tilt it and you should see light shift across the wet surface. If there are dry patches, go back and wet them.
Wait ten seconds. Tilt the paper slightly. If water runs freely, it is too wet — blot with a dry brush or paper towel. If the sheen is already disappearing, work quickly.
This wetting step is the most important. Everything else depends on getting it right.
Step 2 — Drop in the sky
Mix a loose, relatively dilute grey-blue. For monsoon skies: more grey than blue. The sky during peak monsoon is not the bright blue of a clear day — it is a heavy, luminous silver-grey with blue undertones.
Load your brush generously and touch it to the wet paper near the top of the sky area. The paint should spread outward from where you touched, following the moisture in the paper. Do not push it. Let it go where it wants.
Drop in a second touch of paint slightly lower, a marginally different value. They will bleed into each other in the wet surface. This is the technique working correctly.
The critical rule: once you drop in paint, do not add more to the same area until it is completely dry. Every touch on a drying wash makes it worse without exception.
Step 3 — The horizon and treeline
While the sky is still wet, mix a slightly darker, greener grey. Touch the brush at the bottom edge of your wet sky area. The dark green will bleed upward slightly — this upward bleed is what creates the soft, misty quality where trees meet sky in a rainy landscape. You are not painting it. You are allowing it.
This is the moment that feels like magic the first time it works.
Step 4 — Foreground (wet-on-dry)
Let the sky dry completely. This takes at least twenty minutes. Do not rush it.
Once dry, switch to wet-on-dry for foreground elements — a path, a building edge, dark tree trunks in the middle distance. These get hard edges because they are painted onto dry paper. The contrast between soft atmospheric background and harder foreground creates depth without effort.
In Monsoon Village, the rooftops and foreground vegetation were all painted wet-on-dry over a wet-on-wet background. The technique combination is the entire visual logic of the painting.
Step 5 — Reflections
A flooded monsoon path reflects the sky. To paint this, repeat the sky colours in the lower portion using wet-on-wet again, but with slightly less water and slightly more pigment than the sky. The reflection is always marginally darker and more saturated than the sky above it — not much, but enough for the eye to read it correctly.
The horizontal quality of reflection strokes, versus the more diffuse quality of the sky, is what makes the eye read it as water. In Tea Stall, the reflections carry the warmth of the stall's light, showing how wet-on-wet can hold both atmosphere and specific light temperature simultaneously.
Painting in Actual Monsoon Conditions — What Changes
Working in Kolkata during the actual monsoon months changes the technique in ways Western watercolor tutorials never address, because they are written from dry studios in temperate climates.
When ambient humidity is above 80%, washes that dry in five minutes in December take thirty minutes or more. The wet window stays open far longer. This sounds helpful. In practice, it means you wait longer before adding detail, and the extended drying time increases the risk of unwanted bleeds when adjacent wet areas touch each other.
I work on smaller passages during monsoon months, letting each section fully dry before moving adjacent to it. I keep a hair dryer nearby — not to force-dry passages, which causes the paint to lift unpredictably, but to confirm that a passage is genuinely dry before I paint next to it.
The humidity also affects how pigment granulates. In A Snowy Morning in Kedarnath, the granulation in the mountain passages behaved completely differently in the dry winter months than in monsoon sessions using the same pigments on the same paper. The environment is part of the painting — not just the subject.
Why watercolor is specifically suited to Indian conditions covers this in full.
Value, Not Colour — The Most Important Lesson
Most people approach watercolor colour-first. Which blue for the sky. Which green for the trees. Whether to use burnt sienna or raw umber for the path. This is understandable — colour is visible and nameable. In watercolor, particularly in wet-on-wet atmospheric work, colour is almost the last thing that matters.
What matters is value. How light is this passage relative to the one next to it?
A monsoon sky works because it is lighter than the treeline below it — not because it is the correct shade of grey-blue. The treeline reads as dark vegetation not because it is a recognizable green, but because it is several values darker than the sky. Reflected water reads as sky-coloured not because of its hue, but because it is close to the same value.
When a painting looks wrong and you cannot identify why, check the values before changing any colours. Hold the painting at arm's length and squint. Does the sky look lighter than the ground? Does the distance look lighter than the foreground? If not, value is the problem, and more colour will not fix it.
Water controls value in watercolor. More water = lighter value. Less water = darker value. The colour itself is secondary. This is why the embedded video emphasizes water control above everything else.
Common Mistakes and What They Actually Mean
The bloom (cauliflower mark). Wet paint touched to a wash that was partially but not completely dry. The new moisture pushes old pigment outward in a hard-edged ring. Prevention: wait longer. Dry paper is matte with no surface sheen; the back of the sheet feels cool if moisture is still present.
The flat, grey sky. Almost always too much water and too little pigment. The pigment dispersed so far it lost its value. Mix stronger than you think you need to — watercolor dries 30–40% lighter than it looks wet.
Paint that won't spread. Paper dried between wetting and applying paint. Re-wet carefully, but if there is already paint on the surface, re-wetting can lift it unpredictably. Prevention: work more quickly after wetting, or work in smaller sections.
Muddy colours where two wet areas met. Usually two complementary colours bled into each other — monsoon greens (yellow-bias) bleeding into purplish-grey skies is the common version. Prevention: keep wet areas from touching until both are dry, or accept the bleed. Some of the most atmospheric passages in wet-on-wet work are exactly this accident.
A Note on Materials
You do not need expensive paper to practice wet-on-wet. But you do need paper that handles water without immediately buckling. 300gsm is the standard — at this weight the paper absorbs what you put on it without warping into shapes that cause paint to pool in the wrong places. Lighter paper buckles, and a buckled surface changes where the wet paint goes. The full paper guide covers which papers handle wet-on-wet best.
For pigments: student-grade paints lose their value when diluted. This matters more in wet-on-wet than in any other technique because you are working with a great deal of water. If washes keep going flat and grey, the paint may be the problem. Professional-grade paints — Winsor & Newton Professional, Daniel Smith Extra Fine — carry pigment at a concentration that survives dilution and still arrives at the right value on the paper.
About the Artist
Joy Mukherjee is a self-taught watercolor artist based in Kolkata, India. Working primarily in landscape and narrative subjects — Indian Himalayan light, monsoon village scenes, Scandinavian harbour mornings — their paintings have been exhibited at the Indian Art Carnival Season 7, Shantiniketan (December 2025), and are held in private collections across India and abroad. Browse the full portfolio at artbyjoy.shop or follow the process on Instagram.
Explore the Nature Watercolor Collection, browse Original Landscape Paintings, or view available originals.
Related: Wet-on-Wet vs Wet-on-Dry Watercolor — Full Comparison · What Makes Watercolor Unique as a Medium · Best Watercolor Paper for Landscapes · Monsoon in Indian Art · Why Watercolor Is the Perfect Medium for India's Landscapes
Frequently Asked Questions
What is wet-on-wet technique in watercolor painting?
Applying wet paint onto paper that has already been wetted with clean water. The paint spreads and diffuses into the moisture, creating soft edges impossible to achieve on dry paper. The primary technique for skies, mist, atmospheric distance, and any subject where soft, blurred edges are needed.
How do I control paint spread in wet-on-wet watercolor?
By controlling water on both paper and brush. Paper should be shiny-wet but not pooling — if water runs freely when you tilt it, it is too wet. Brush should be loaded but not dripping. Drier paper = less spread. Wetter paper = more spread. This balance is the skill.
Why does my watercolor sky look flat and grey?
Usually too much water, too little pigment. Heavily diluted paint disperses so far it loses value and looks washed out. Mix stronger than you think you need to — watercolor dries 30–40% lighter than it appears wet. Student-grade paints also dilute poorly; professional pigments hold value better at high water ratios.
What colours do I need to paint a monsoon sky?
Very few. A grey-blue (Payne's grey, or ultramarine mixed with burnt sienna), raw umber for warm cloud passages, and a mid-green for distant vegetation. Three colours are enough for a first monsoon sky study. Value relationships between them matter far more than which specific colours they are.
Why do my wet-on-wet washes get cauliflower bloom marks?
Because paint touched a wash that was partially but not completely dry. New moisture pushes old pigment outward in a hard-edged ring. Prevention: wait until the previous wash is completely dry — matte surface, no sheen, back of paper cool to the touch — before painting adjacent areas.
Can I practice wet-on-wet without painting a full scene?
Yes — and this is the better approach. Wet a quarter sheet completely, drop in two or three colours, and watch what happens without trying to control the result. Repeat ten times with different pigment concentrations. This teaches the material's behavior directly, which is the only way to develop real judgment.
Is wet-on-wet suitable for complete beginners?
Yes, with managed expectations. The technique is simple to begin but takes time to develop subtlety. Monsoon atmospheric skies are forgiving subjects — mistakes often read as atmospheric quality rather than errors. Start with sky studies before attempting full compositions.
How is painting a monsoon sky different from a clear sky?
A clear sky has a value gradation from deep blue at the top to pale blue at the horizon — painted wet-on-wet with controlled pigment concentration. A monsoon sky is heavier, more uniform in value, grey dominating blue. The challenge is keeping it luminous rather than dead, which requires slightly warm tones in the grey mix.
How do you create a watercolor rain effect?
Rain is not painted as individual drops. It is suggested through soft edges, diffused light, reduced contrast, and reflections — all created through wet-on-wet technique. The atmosphere of rain matters more than depicting water falling.

Written by Joy Mukherjee
Joy Mukherjee is a watercolor artist who paints landscapes, village scenes, and atmospheric moments using transparent watercolor on premium 100% cotton watercolor paper. His work is born from memory, light, and atmosphere.

